
By Sarah E. White, mama, blogger and author of Quick & Easy Baby Knits
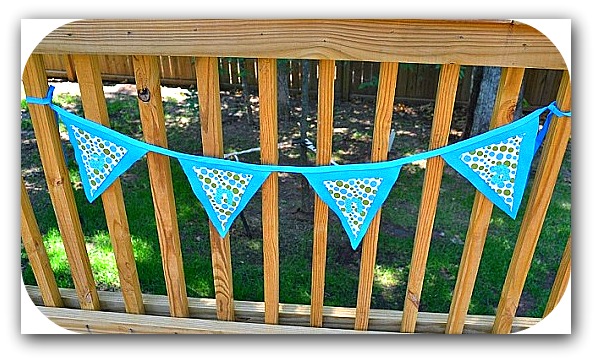
I love adding crafty little touches to my daughter’s birthday celebrations. And with her party looming – and no real idea what I’m going to do this year! – I’m reminded of the super-cute name bunting I made for her a couple of years ago.
This is an almost no-sew project made with felt and a little bit of fabric. You could probably do the whole thing with fabric glue if you wanted, especially if you did it all with felt, making this a completely no-sew project.
Either way it’s pretty fast (at least for kids with short names) and a really cute way to decorate a gift table or anywhere else at the party that needs a special touch. And you can hang it in the child’s room after for a lasting memory of a fun day.
Materials
- One piece of felt for each letter you want to cut out
- A small amount of fabric for the second layer triangle (probably about ¼ yard would do it, unless your kid has a really long name)
- An even smaller amount of fabric for the letters
- Computer and printer
- Sewing machine and iron (optional)
- Scissors
- Fabric glue
- One package fold-over bias tape
Instructions
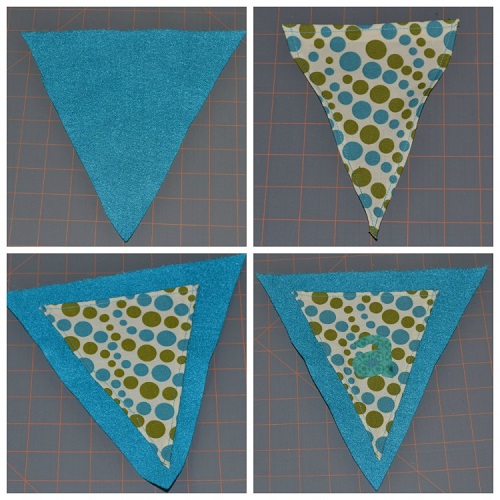
1. Cut large triangles out of the felt. Mine are 8 inches wide at the top and 10 inches long on the sides, and measure 9 inches from tip to top.
2. Cut smaller triangles out of fabric. The finished size on mine is 5.5 inches at the top, 7 inches on the sides and 7 inches from tip to top. They were slightly larger than that when I cut them, because I pressed down the edge and sewed it down. You could also use pinking shears instead, or just leave the edges raw. Attach the fabric triangle to the felt triangle by sewing or with fabric glue.
3. Use your computer’s word processing program to find a font you like and print out the letters you need really, really big. Mine are about 2 inches tall, but they’re all short letters. I think I used Arial Black in a couple hundred point. Cut out the letters, then cut them out of your contrast fabric. You can use pinking shears here, too, if you like. I left my plain and they’ve frayed very little through the years.
4. Use fabric glue to attach one letter to each triangle. Allow to dry.
5. Arrange the letters in order and the way you want them on your bias tape, which is the tie for the banner. I left 18 inches on each side of the name for ties, and spaced the triangles about 3 inches apart, but you can do it however you like.
6. Use fabric glue to attach the triangles where you want them. Put glue on both sides of the top edge of the triangle and slide it into the fold of the bias tape. Allow to dry before hanging.
You could do the same thing without a name for any celebration, or add a meaningful word to make a bunting for Thanksgiving, Christmas or to hang whenever you need inspiration.
 Sarah E. White is a crafter, blogger and mom in Fayetteville. She writes about craft, creativity and family for Our Daily Craft, is the editor of About.com Knitting and Knitting at Craft Gossip, and the author of the book Quick & Easy Baby Knits (Stackpole Books).